Document Actions
JDEE(Java Development Environment for Emacs)の紹介
http://www.bookshelf.jp/soft/meadow.html (必読) から http://jdee.sunsite.dk/ のJDEE(Java Development Environment for Emacs)をインストールしました。
Debianなら次のようにインストールできます。
# aptitude install jde
JDEEの凄い所を説明します。
1.準備
build.xmlの中身(引用の都合で空行は削っています)
<project name="MyTest" default="compile" basedir=".">
  <property name="src" location="."/>
  <property name="build" location="."/>
  <target name="compile">
    <javac srcdir="${src}" destdir="${build}" debug="on" />
  </target>
  <target name="junit" depends="compile" description="Run JUnit Tests">
        <junit printsummary="on" fork="false" haltonfailure="false" failureproperty="tests.failed" showoutput="true">
            <formatter type="brief" usefile="false"/>
            <batchtest>
                <fileset dir="${build}">
                    <include name="**/Test*.*"/>
                </fileset>
            </batchtest>
        </junit>
         <fail if="tests.failed">
        tests.failed=${tests.failed}
        ***********************************************************
        ****  One or more tests failed!  Check the output ...  ****
        ***********************************************************
        </fail>
    </target>
</project>
StrConcat.javaの中身(意図は名前で推測してください。実装がすぐに目に浮かぶほどくだらないinterfaceですが、説明のための例なので許してください)
public interface StrConcat {
    void pushString(String str);
    String getResult();
}
コード補完のために、CLASSPATH内にStrConcat.classが無いといけないので、StrConcat.javaをコンパイルしておきます。
2. 実装
上のinterfaceの実装クラスを作ります。StrConcatImpl.javaファイルを新規作成して、次のコマンドを実行します(jde-gen-なんとかが、コード自動生成のコマンドです)。
M-x jde-gen-class
次のように質問があるので適切に答えます。
Packge: (テストのため無視。そのままエンターキー)
extends: (テストのため無視。そのままエンターキー)
implements: StrConcat (を入力)
次のソースコードが自動生成されます。本当は先頭にファイル説明コメントがありますが、削っています。 (引用の都合で空行は削っています)
public class StrConcatImpl implements StrConcat {
    public StrConcatImpl() {
    }
    // Implementation of StrConcat
    /**
     * Describe <code>getResult</code> method here.
     *
     * @return a <code>String</code> value
     */
    public String getResult() {
        return null;
    }
    /**
     * Describe <code>pushString</code> method here.
     *
     * @param string a <code>String</code> value
     */
    public void pushString(String string) {
    }
}
予想を裏切ってStringBufferではなく、StringBuilderで実装したソースが次です。 (引用の都合で空行を削っています)
public class StrConcatImpl implements StrConcat {
    private StringBuilder sb;
    public StrConcatImpl() {
        sb = new StringBuilder();
    }
    // Implementation of StrConcat
    /**
     * Describe <code>getResult</code> method here.
     *
     * @return a <code>String</code> value
     */
    public String getResult() {
        return sb.toString();
    }
    /**
     * Describe <code>pushString</code> method here.
     *
     * @param string a <code>String</code> value
     */
    public void pushString(String string) {
        sb.append(str);
    }
}
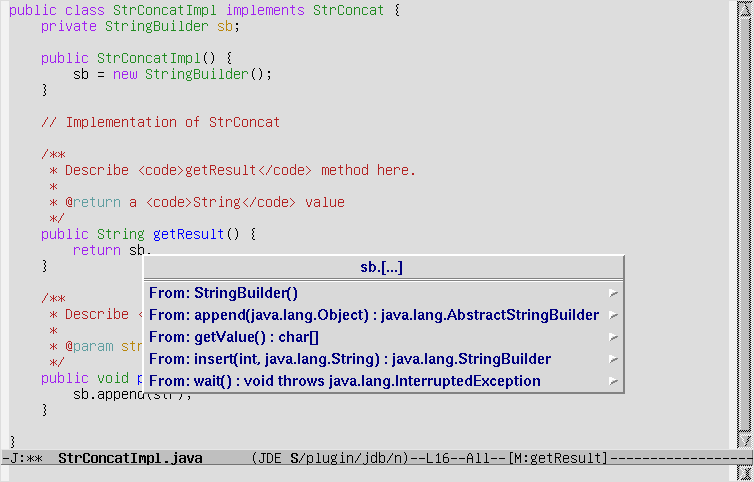
getResult()メソッドで、sb.の後ろにカーソルがある状態でC-c C-v C-.と打つと、次のようにメソッド名の候補が表示されます。先頭の文字を入力してC-c C-v .と打つと補完入力してくれます。さようならEclipse。
3. デバッグ
コードができたらビルドします。 M-x compileと入力します。Compiler command:を聞かれるので、次のように入力します。
Compile command: ant -emacs
すると、次のようにコンパイルエラーが見つかりました。
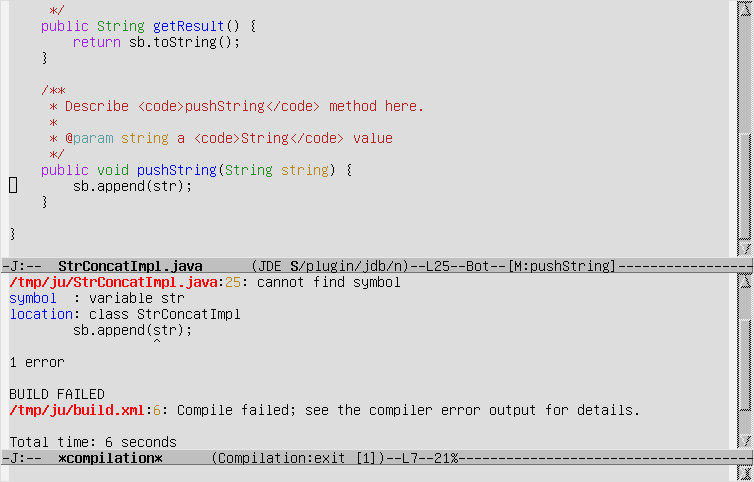
慌てず、antのエラー表示行でC-mキーを押します。すると、エラーのある行に自動で飛びます。
public void pushString(String string) {
    sb.append(str);
}
interfaceの定義では、メソッドの引数の名前をstrにしていたのですが、自動生成したコードの引数名はstringになっています。この辺は自動生成の弊害でしょうか。とりあえず修正してビルドが通ることを確認します。
4. テスト
次にJUnitを利用したテストコードを書きます。 テスト原理主義者からは、テストコードを書く順番と実装クラスを書く順番が逆だと怒られそうですが、気にしません。今日はJDEEの説明が目的です。
TestStrConcat.javaの中身(引用の都合で空行は削っています)
import junit.framework.TestCase;
public class TestStrConcat extends TestCase {
    private StrConcat sc;
    public void setUp() {
        sc = new StrConcatImpl();
    }
    public void testSimple() {
        sc.pushString("foo");
        assertEquals(sc.getResult(), "foo");
    }
    public void testNull() {
        sc.pushString(null);
        assertEquals(sc.getResult(), "");
    }
}
build.xmlはファイル名の先頭がTestで始まるファイルを勝手にJUnitのテストコードと認識するようになっているので、M-x compileの後、次のように入力します。
Compile command: ant -emacs junit
次のようにテストが見事にこけました。
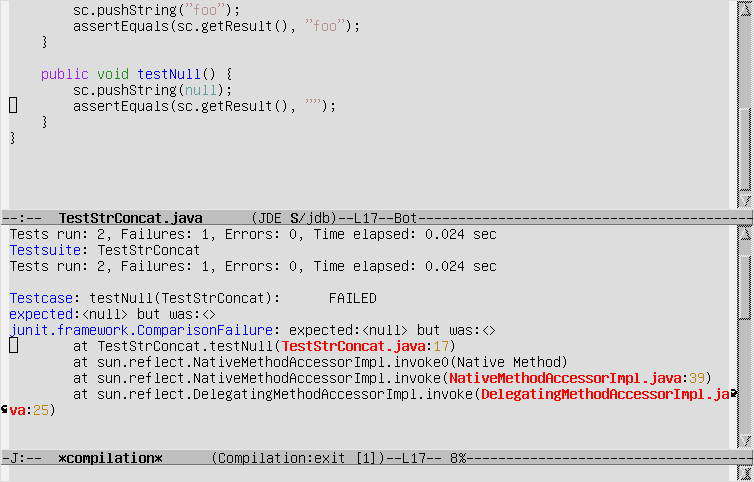
またまた慌てず、antのエラー表示行でC-mキーを押します。テスト失敗の該当行に自動で飛びます。nullを渡したケースを考慮していなかったので、次のように修正します。
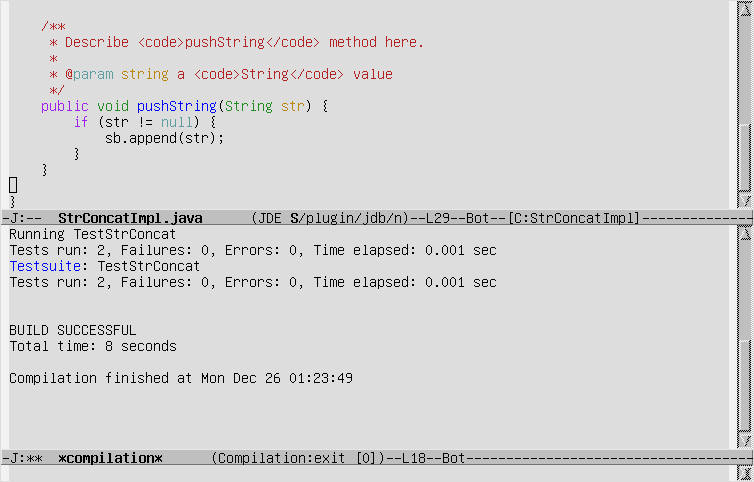
public void pushString(String str) {
    if (str != null) {
        sb.append(str);
    }
}
再びM-x compileします。 無事にテストが通りました。こんな短いコードのコンパイルと実行に8秒もかかっているのが泣けますが。
悲しいこと。 JDEEをいれてからEmacsの起動が重くなりました。 一ヵ月後にはアンインストールしているかもしれません。
- Category(s)
- カテゴリなし
- The URL to Trackback this entry is:
- http://dev.ariel-networks.com/Members/inoue/jdee/tbping